Varnishing Guide Decorative artists looks forward to varnishing their project either
because it means they're on the last leg of the journey or because
they can’t wait to display it or give it the person it was
intended for. I’d like to think it’s because it gives
us a sense of completion. Varnishing is the final step in decorative
painting and another very important one.
Why varnish your projects?
After all, your acrylic paints have quickly dried to a hard and
durable surface. It can be wiped clean. While it’s true that
acrylics dry fast to a durable film, there a number of compelling
reasons for varnishing your projects.
First and foremost is that acrylic paint films, even when fully
dry, are in fact micro-porous so they attract dust, grease and moisture
from the surrounding air.
Cigarette smoke, atmospheric pollution,
fingerprints, food stains, water drips, and everyday dirt and dust
that comes into contact with your painted project can and will become
part of the paint film. Over the course of years, grime will accumulate
and ruin your project. Polyurethane varnish dries to a non-tacky,
hard surface that is resistant to retention of dirt and other elements.
Varnishing also:
- protects your project against scratches caused by handling – makes
it durable
- boosts the brightness and color saturation and adds depth to
your painting
- adjusts and “unifies” the surface sheen
- protects your colors from ultraviolet light. (Any varnish will
afford some protection but those with UV inhibitors offer extended
protection from color fading.)
- protects your project from discoloring due to humidity and heat
- allows for easy cleaning without fear of removing the paint
film
- protects your project against moisture
So, once you have so dutifully and enthusiastically painted that
project, varnishing basically seals your design and
protects your project. Varnishing essentially prolongs the life of
your project.
It’s very important to get varnishing right because it also
ultimately affects the total look and finish of your project. Beginning
decorative artists, and even experienced ones feel daunted about
varnishing as they are afraid they may ruin their project in the
process of doing so. Some wish they didn't have to do it at all!
The only way to get out of this fear is to learn all you can about
varnishing and how to avoid the pitfalls - basically learn how to do it right.
What is a badly varnished project?
- Uneven thickness of varnish - thick here and thin there
- Lumps, bumps, drips and ridges on the surface
- Ridges at angles and corners
- Visible brush marks
- Finger prints!
- Visible brush hairs!
- Impurities on the surface
- Sections left unvarnished
- Sections spoiled by handling before the varnish has dried completely
A badly varnished project will diminish the overall impression of
quality – so varnishing well is another key skill for decorative
artists.
First - when should you varnish your work? The design you painted on your project must be completely dried
and cured for 48-72 hours before varnishing. It’s tempting
to immediately start varnishing once you have finished painting and
you think the paint is dry. BUT resist that temptation because I
can tell you some horror stories. In general, you should also varnish your project within a month
of completing all the painting. If you leave your project unvarnished
for a longer period of time you risk creating a build-up of grime
and dust that will embed itself into your painting.
What kind of varnish to use – spray
or brush-on?
Spray varnish for decorative artists comes with a cancer warning
and unless you apply it in a well-ventilated room and use a protective
mask, you are putting yourself at risk unnecessarily. Spray varnish
used correctly does however, give a much more superior finish than
brush-on varnish. Key word – correctly. It takes a lot of practice
to get the desired results with spray varnish. A brush-on varnish
can also give you a great finish to complement your project.
Matte, satin or gloss varnish? Each gives a different degree of sheen to your painted project:
- Matte varnish gives a satiny, non-glare, low-sheen, low-reflection
finish that intensifies dull colors without drastically reducing
color depth.
- Gloss varnish on the other hand produces a high-gloss, clear
finish. It increases the depth, and intensity of colors. The more
intense depth of color and gloss also imitates the finish of an
oil painting.
- Satin varnish gives a semi-gloss, medium sheen finish with reduced
reflection. You can mix equal parts of matte and gloss varnish
to get a satin finish.
Different varnishes are suitable for different painting techniques.
In general, “country” type projects should be given a
matte finish. Russian zhostovo projects should be varnished with
gloss varnish as this gives it the look of its traditional lustrous
lacquer. Satin varnish is generally suitable for all kinds of projects.
Use gloss varnish if you have painted on tin or ceramic bisque – it
imitates the original look of the item. Gloss varnish on an ostrich
egg gives it the look of fine china. If you are painting a project
from a book or pattern packet, the type of varnish to be used with
the project will normally be suggested.
Which brand of varnish to use? There are several types of varnish available on the market – the
most widely used by decorative artists is water-based, polyurethane
varnish. Like acrylic paint used to paint the design, this type of
varnish is easy to use because you clean up with water and you can
dilute it with water. It’s also non-toxic. Which brands? For one thing, I avoid completely the commercial varnish
sold in cans by the litre because I have tried them and destroyed
some very pretty projects in the process. I stick to water-based
varnish developed specifically for decorative artists and there are
several brands available on the market. Regardless of
the brand you purchase and use, read the properties and instructions
on each bottle carefully. As a guide, here is a synopsis of some
brands available on the market for decorative artists and what
each
manufacturer says about their product:
- Decoart™ Americana Satin Varnish: Gives wood projects a
tough, durable, clear acrylic finish. Safe, non-toxic, dries to
a clear finish that won't yellow with age. Water-based.
- Decoart™ DuraClear Satin: Polyurethane varnish that forms
a tough, flexible, clear and colorless finish that dries quickly.
Weatherproof.
- Ceramcoat® 7007 Satin Water Base Varnish: Acrylic polymer
that forms a tough, flexible, ultraviolet-resistant film. May be
used over or under acrylics and oils. Non-toxic, low odor and water
based. Easy to clean up. Has a medium sheen finish.
- Plaid Folkart Satin Varnish: Specially formulated to provide
a beautiful satin finish over acrylic or oil paints. Superior formula
features ample open time for smooth application and quick dry time.
Water based.
- J.W. Etc. Right-Step Satin Water Based Varnish: Produces an oil
based finish with water based ease. Excellent over both oil and
acrylic paint. Dries crystal clear to touch in 15 minutes. Dry
film is baby safe.
- J. W. Etc. Exterior Satin Varnish: Non-yellowing and dries clear
with a tough finish that creates a water-resistant barrier. This
durable crack-resistant varnish safeguards your projects from damage
by heat and cold. It's simple to apply, has little odor and cleans
up with soap and water. Water-based, clear and non-toxic.
- JoSonja's® Acrylic Satin Varnish is specially formulated
to provide a general purpose finish which dries crystal clear.
Suitable for both indoor and outdoor use.
- Krylon® Satin Finish is a durable interior/exterior varnish.
Resists alcohol, hot beverages and all kinds of abuse. Lead free
and non-toxic when dry.
Varnishing
Rules Take your time
Rule number one - never varnish in a hurry. Take your time. Relax.
Plan in advance of a project you want to varnish. Or well before
you intend to give it away if it’s a gift. If you wait till
an hour before, you stress yourself unnecessarily! You will take
short cuts and be sloppy. Plus, you risk spoiling the varnish when
you wrap the project, for example, because the varnish has not completely
dried underneath all those coats. Also - postpone everything else!
You really don't want to be interrupted when you're varnishing...
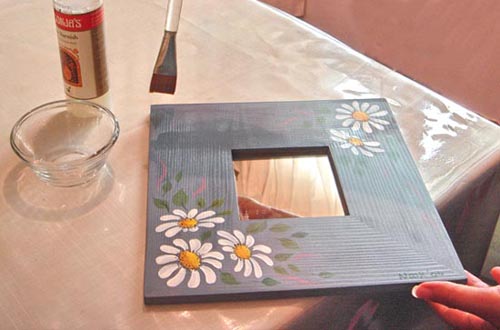
Prepare your work area and supplies
- Lay out all the tools you need for varnishing a project. When
you have everything you need where you need them, you will also
be more relaxed. If you haven't laid out your supplies, you will
be leaving your loaded brush and partially varnished surface to
look for things and they will start to dry. What do you need?
- palette knife
- hairdryer - plug it in
- brush basin
- varnish (do you have enough?)
- water or flow medium
- varnishing brush or sponge roller
- small dish for varnish or your wet palette (more about
this below)
- greaseproof paper
- wet-wipes to clean your hands if you get varnish on them
- The environment you varnish in is important too
- make sure you're working in a clean and dust free area
- don’t varnish in the path of a fan or air-conditioner – your
varnish may dry in the brush before you hit the surface
- clear the space on your table of things you don't need – this
includes other projects which you may want to varnish at
the same time. The last thing you want to do is splash varnish
on your other projects.
- give yourself room to work
Give your project a final check before you start
- Are there any tracing lines still visible? Once you’ve
varnished it, those lines are part of your design!
- Have you signed your name?
- Is the surface clean and dust-free? You can wipe it with a soft
dry cloth to make sure its free of dust and anything else.
Use the right varnishing tools
A good varnishing brush helps ensure you get a smooth coat of varnish.
You should try to dedicate a separate brush for varnishing – one
that you will not use for glazing or basecoating. By doing this
you ensure that it will never get tainted by paint or other mediums
- imagine varnishing and seeing dried bits of paint coming off your
brush onto your varnish, or your varnish changing colour because
the brush had remnants of paint from your last basecoating job!
What do you look for in a varnishing brush?
- The standard 1” flat brush you use for basecoating is adequate.
But for larger objects, a flat brush which is at least 2" wide
may work better.
- The bristles can be either synthetic or natural hair, but they should
be soft with a bit of spring.
- Avoid synthetic brushes with very thick hairs as this will be
scratchy and leave brush marks when you varnish.
- The hairs should also be well-anchored in the ferrule, otherwise
hairs will keep falling out as you apply the varnish.
- As with basecoating, a smaller surface or area is best varnished
with a smaller brush. In general, use the biggest brush you can
for the surface you are varnishing.
If you haven't tried varnishing with a small sponge roller, you
should - it works wonders. Get a good quality 2" sponge roller
from a hardware store or decorative painting supplier. Varnishing
with a sponge roller has certain advantages - its fast, varnish is
spread evenly, no brush marks and certainly no ridges plus it gives
an excellent eggshell finish. I highly recommend varnishing with
a sponge roller especially for large surfaces like trays etc.
Use the right consistency of varnish
- Whether you're varnishing with a brush or a roller sponge, you
can usually use varnish directly from the bottle but roll the bottle
gently before you start. Don’t vigorously shake the bottle
as this will make the varnish bubble.
- Since the varnish is water-based, you can thin it down a little
with either water or flow medium if you feel it’s too thick.
- Check to ensure that there are no lumps or solidified varnish
in your brush or puddle before you start. If you find any, remove it. If you
notice it after you have applied the varnish on your piece, lift
it with the corner of your brush and quickly brush over the section
again to smoothen it.
Remove all metal hardware
The worst thing you can do is to apply your varnish over hardware
- such as hinges, catches etc - on a box! I advocate removing all
hinges and catches and keeping them in a safe place when you first
basecoat your project – keep them safe and reapply only after
you have varnished the project. You will need to regularly tighten
the screws over time and varnishing over them will practically seal
them in so you won’t be able to tighten the screws. If your
project is a box where the hinges or catches are nailed on instead
of screwed on and you can't remove them, just varnish around the
hardware.
Varnish everything!
Don't be lazy and varnish only the top of a plate, for example,
and leave the bottom bare, or varnish the outside of a box and not
the inside and bottom! It’s important that you varnish every
part of your item because especially for MDF, the varnish will help
to further seal out moisture.
How many coats of varnish?
It depends on what kind of object you are varnishing. From experience,
I apply these simple guidelines - remember that the goal is to create
a smooth, even, finish which will not only protect your project but
enhance it and that is what's most important:
- Generally, I apply a minimum of three coats of varnish regardless
of the kind of project I have painted - by the third coat, the
surface is smooth, yet has sufficient protection and I can see
that it has added depth to my project.
- Consider the kind of project
you have painted.
- Items that will be used on a daily basis like placemats,
coasters, trays, for example, will need to be more durable – so
apply more coats. I have varnished up to 15 coats for a placemat
and tray. You won’t regret it.
- Plaques and decorative items that are not likely to be
handled a lot will need fewer coats.
- Apply varnish in several thin coats, rather than one thick coat.
A thick coat will take longer to dry, may dry cloudy, may drip
or sag during application and has a greater chance of showing brush
strokes when dry.
- If you are using a sponge roller, you will need more coats than
if you are using a brush. This is because you're actually applying
a thinner coat of varnish each time.
- Dark colours especially black are more difficult to varnish – the
first coat will scare you into thinking you’ve ruined your
project – carry on and apply a few more coats and you will
get a satisfactory finish.
- Pale colours including white, cream, yellow are easier to varnish
and look good after the second coat but this doesn’t mean
you stop there – consider the use of the project and apply
more coats if necessary.
How do you varnish?
I use my wet palette when varnishing. I find that I can take my
time to varnish - even if I have to stop in between, I don't come
back to dried or hardened varnish. This tends to happen when you
use a paper plate or dish to hold your varnish. When I use a wet
palette, I prepare it the same way I do when I am using it to basecoat
or paint my design. When I varnish using a roller sponge and wet palette:
- I pour a small amount of varnish on the palette and mix it with water
or flow medium if necessary. I mix it well using my pallette knife
then load my roller sponge evenly by rolling it back and forth in
the puddle starting at the edge of the puddle.
- I apply the varnish by rolling it back and forth on the surface.
- If I see bubbles on the surface I keep rolling without lifting
the roller until the bubbles disappear.
- Don't press the roller too hard or you will leave roller marks
(lines) on the surface.
- Apply even pressure when rolling and never press too hard otherwise
the roller will create foam on its sides.
- Stop when you feel the varnish is starting to dry.
- Dry, using a hairdryer, moving it evenly over the surface and
not letting the hot air stay too long at one spot – this
may cause cracks.
If I'm using a brush to varnish, I still use my wet palette.
- I load the varnishing brush the same way I would load a brush
for basecoating or painting your design and make sure that the brush
is not overloaded with varnish - this is what creates ridges.
Varnish will also seep over the edges.
- I varnish with a brush using a rhythmic slip-slap movement with
my wrist and then brush it in one direction to smooth it. Smooth
in the direction of the wood grain if your project is made of wood.
- Work on small sections at a time and re-load the brush when moving
to another section.
- Don't over-brush. Stop when the varnish is even. If you keep
brushing once the varnish starts to dry, you will leave brush marks.
- If you feel the brush dragging, you probably don't have enough
varnish on the brush - reload the brush regularly.
- Brush marks are also sometimes caused by the varnish being too thick
- add flow medium to get a smooth consistency.
- When the varnish is in this loose consistency, don’t brush
vigorously as this will cause bubbles.
Here are some other considerations regardless of whether you are
using a roller or a brush to varnish:
- If you’re varnishing with a roller you will have no choice
but to place your project flat on the table. If using a brush and
you’re more comfortable holding the project in your hand,
do so but don’t varnish vertically as you risk the varnish
running.
- If you’re not sure whether you’ve varnished all
the areas on a flat surface such as a placemat, just hold the project
at an angle against the light and you will be able to see parts
that might not have been covered by varnish.
- While varnishing, regularly check at all angles for bubbles.
Even them out immediately.
- Do not rework areas you have missed, as the brush or roller
could pick up partially dried varnish and cause clouding. If areas
are missed, wait until the varnish is dry and apply another coat.
- Similarly, once you finish working on an area, do not go back
over it. If you do, you risk dragging partially dry resin into
the wet area, which will dry cloudy over dark colors.
- If your varnish comes in a jar or tub, don't be tempted to take
shortcuts by dipping your brush or roller into the jar. If you
do, you risk adding impurities from the brush or surface into your
varnish. Brush hairs may also get into the varnish.
- Remember to pour out only the amount you need for a coat of varnish at a time.
Don’t pour out more than you need. This ensures you have
fresh varnish for each coat.
- Apply the next coat of varnish only after the first coat has
dried.
- When using your hairdryer to dry each coat, do it away from
your brush, sponge and palette. Heat from the hairdryer will also
dry your brush and roller!
- After drying a coat of varnish with a hairdryer, wait till the
surface is cool again before applying the next coat. The warm surface
will instantly dry any new varnish you apply and drag the brush!
|